Sunday, July 15, 2012

The most amazing retro inspired cafe ever

We have all been in Motueka for a few days. Aaron worked so the boys and I hitched a lift and we all stayed with my parents. We had a great time. My Mother had been keeping one surprise for us. A new cafe, coffee roastery and retro shop called Retrotonic. It is amazing. Great for men and women of all ages. Vintage cars, clothes, furniture, crockery - you name it they have it.


You order your coffee (roasted and ground on the premesis) from the caravan and then wander around while drinking. Fantastic coffee too. We thought it some of the best tasting coffee in Motueka. As much as we love Toad Hall, their food and atmosphere, their coffee isn't the greatest but this was.

So all you retro minded people, rock into this cafe.

Tuesday, July 10, 2012

Bedroom makeover - stage 3

Well I am now down to the fine tuning of the room. The Black curtain is up - just need a hook on the wall to hook it back during the day. The blue, with yellow and orange flecks, sofa has been recovered using a black fitted sheet. The base of the bed has also been recovered using a black fitted sheet instead of a valance. The white duvets I made from old sheets - here- look great on top of the bed.
So - hook for curtain, New quilt to match the room, and fix the storage issue - the bookcase is so shallow that everything falls out of it, and then it will be done.


Teddy enjoys the new sofa

Sunday, July 8, 2012

Yes we have some bananas


I have a whole box of banana's in fact. I went down Marshland Road on Saturday to buy some white wisteria from Gayle at Country Gardens. In between that nursery and the QE11 corner there is a fruit shop (actually there are several). I stopped in at the one nearest Country Gardens and bananas were $1.79kg. Bananas are great if you have been ill as when vomiting you tend to get quite low in potassium and bananas have lots of that so it is good for replacement and getting well. ( I was once hospitalised from vomiting too much and all they did was put in a potassium drip and I felt wonderful - it was the Dr there that told me to eat bananas if sick).
Anyway I went to get about 3 kg or $5 worth and there were boxes of bananas for $8 - I kid you not - 15kg of bananas for $8, so of course I bought the box. I also bought cheap apples $0.99kg and NZ oranges yummy. So we are fruit city at the moment.

Jakob and I drove past the big sign that said "nursery" the other day when we were on the way to see Jess and baby Alex. Jakob said "Mum you just missed the turn, the hospital is down there". My reply was obviously that the hospital was in town. Then he said "But the baby one is down there, it said nursery". Don't know if you had to be there but it was very funny.


I then made a quadruple mixture of Yoyo's otherwise known as melting moments. Took a lot longer than I thought it would! So tomorrow is delivery day - a little bit of sunshine in some Yoyo's and some bananas.

Congratulation Nic - winner of Melly and Me pattern

Congratulations to Nic Mckinlay-Clark who has won the Petunia giveaway. 

Saturday, July 7, 2012

Welcome to the world


This week we welcomed our newest family member to the world. Tiny little Alex Warwick Schulz 6lb, born safely by caesarean section. Mother and baby are well but have had a few hiccups. Still in hospital sorting things out.

Eli is a sports star


Yes Eli is in the local newspaper - Northern Outlook - again!! This time playing rugby on club day. They did a one page spread and he managed to get into two of the photos. The one in the top middle and then bottom right.

He loves his rugby and is in the Kaiapoi RFC under seven team. (well one of the teams!). It is a great club and they treat the kids really well. Eli is really wanting to get to tackle, which is what he will be doing next year.


Wednesday, July 4, 2012

On a winning streak

Mollie Makes Issue 12Wow - I just got an email from Sew Pretty - an online craft and fabric store - to say I won their competition and it is a Molly Makes magazine.
I am stoked.
Find the store by clicking on the name above or go to their facebook site.

I also follow Molly Makes on their site - here.

Spiced apple cake - dairy free

Yesterday I had my niece for the day and she loves cake. So I thought I would try to adapt a gorgeous cake by Alison Gofton into dairy free. What a fantastic success.

Please note that this is not fat free, gluten free or egg free (sorry Susannah and Kerryn)

Everyone I know loves the original recipe for this cake. It is good for dessert with some custard or cream while hot, lasts for about 4 days just in the cupboard and holds together well for lunch boxes. I have always liked it as it is great when you are a mum. All mixed in a pot and in the oven 5 minutes later, plus having grated apple makes it seem healthier somehow.

My adaption
Spiced apple cake - dairy free version
Into a bowl put - 100ml vegetable or canola oil,
2 grated apples (skin on),
1 cup sugar,
1 egg - mix it all well
Then add
1 1/2 C flour
1 tsp baking soda (this is not a typo - only B Soda is used)
2 tsp cinnamon
1 tsp alspice (do not substitute for other spices)
1 tsp salt
Mix all till lump free (apart from the grated apples). Put into a lined tin.

Make topping in same bowl, don't worry about any mixture on the side it all just blends in.
3 T vegetable or canola oil
1/2 C rolled oats
1/4 C brown sugar
1 tsp cinnamon - mix it all well. It will be crumbly. Scatter on top of the cake batter.

Put in the oven at 180oC for 30-45 minutes (springs back to the touch). The time varies each time as it depends on the type of apple you use. Some apples have more juice or breakdown and make the batter more sloppy.


Tuesday, July 3, 2012

Breakfast in bed for the boys

I love being able to treat the boys when I can and this morning was meant to be a bit of a rush. Not the normal day to choose to give the boys breakfast in bed. But actually it worked. They ate breakfast and were quiet while I rushed around and sorted out our day.
So they had an Earl Grey Tea (always Dilmah) and toast. The lovely butlers tray that I got for $3 at the Op Shop has been constantly put to good use. We are a family that likes to breakfast in bed - I see it as a real treat.
So they relaxed while I did dishes, put on washing, folded washing, made diary free bread, got ready for a Health and Safety meeting with Fletchers EQR.
In spite of all this we got out the door at 8.30am with no screaming to hurry up, get on with it, or what are you doing????????

Sunday, July 1, 2012

A cold winter picnic

the big steam engine
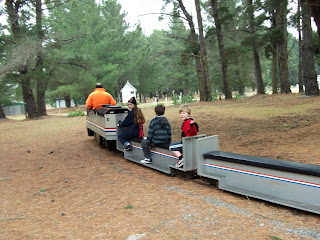
Yes it was a very cold day for a picnic. Only 6 degrees Celsius! But we had a great day.
Aaron has been working all weekend so after church I took the boys and Mikayla out to McLeans Island to go on the miniature railway at Steam Scene.
We took a flask of hot water and had Milo and hot apple cider to warm us up. Then we had lovely cheese toasted sandwiches on the camping stove. Gosh did we need it as it was COLD. But what a great day out.

The steam coming out of the engine
Then swamping us

A bit of larking around

Lovely hot lunch


Then more train rides


Saturday, June 30, 2012

This weeks giveaway is...

Petunia the pig.

This is the complete pattern and instructions for the Melly and Me stuffed animal toy.

This is brand new. If you would like to have this either follow me publicly or leave a comment. All names into the draw on Wednesday night.
Good Luck

My Son has his picture in the local newspaper

Eli - Top left
Eli has been in three local newspapers recently. Wow is that a record?
After Queens Birthday weekend his photo was in the Northern Outlook and the Kaiapoi Advocate for his leading of the Junior Kapa Haka group during the unveiling of a new carving in celebration of the 50th Anniversary of the School.

Then this week he is in the Northern Outlook again for reading with Gerald - the Life Education caravan giraffe.
As it looked in the newspaper
Eli - Top left


Wednesday, June 27, 2012

The perfect dinner for a cold winter's day

Tonight we are having a roast. This is a rare occasion in our household. A lot of this is thanks to Jess and Stephen, as we got a pile of leftover veges from their weekly vege pack.
So what you see is onion, home-grown garlic, butter-nut pumpkin, kumera (sweet potato for non NZers) and yams.

I also have beetroot cooking on the stove and that will be roasted with rock salt plus some potatoes par boiling. These will then be shaken in the pan to create a rough edge and then fan baked in a tiny bit of heated oil (this is Aaron's favourite potatoes and how I learnt to do them at the Cordon Bleu Cookery School).

All of this with a lovely leg of lamb. I might even make some home-made mint sauce.

Here is the meal on the table two hours later. Nope mint sauce was a step too far, but I did get gravy done.

Upcycling secondhand stools

My finished stools
Yesterday after work my sister and I had a couple of hours working hard recovering various stools. This is something I find really satisfying as they look so good when done.

My sister had never completed one before and was a bit nervous about doing it herself. Last year I had a lovely morning with Steff also doing this.
I was going to write a tutorial as we did this, but got so enthusiastic about getting stuck in and making the change that I forget to take photos of some major steps - so next time!

The material is oilcloth from Femme de Brocante, a Rangiora shop to die for. One of my favourites and always have amazing specials.

I would like your opinion though - Sometimes I think it is really neat to leave the industrial look of furniture to show it's heritage.
On the step stool do you think I should scrub it clean of paint etc to make it shiny and new or should I leave the smart top and the industrial look? Please do give me feedback on that.


Stool 1 - before

Stool 1 - finished. Note the matching material
Albie said he was the stool tester!

Stool 2 -start (finish in first photo)


My sisters stools - start

My sisters stools - first ever finished.

Saturday, June 23, 2012

I have run out of compost

It has been a lovely winter day in Kaiapoi for a spot of gardening. I started setting the vegetable garden up for the winter about a month ago. As usual I have not finished. So I attempted to get it done today. BUT - I ran out of compost. So 2/3 of the garden has compost, sawdust, blood and bone and lime. The rest has some green crops growing and some just missed out completely.
Anyway, about a month ago I cleared out the glasshouse and let the chooks have a good rummage around for a couple of days. Then I composted, sawdusted, watered, etc. I thought it best to give it a bit of time to rest (read into that - I ran out of steam and got distracted by other things). So today I planted out the bok choy that I seeded a couple of months ago and some cauliflower and broccoli plants I had been nurturing for quite a while.

They should all be eaten by the time I need to think of spring and summer vege. Yummy. Last year the cauliflowers I grew in the glasshouse were enormous and the best I have ever had. So I have great expectations for this crop.

Thursday, June 21, 2012

Recycling / Upcycling project - glamorous PJ's

When I was recently away at Hanmer Springs with friends they all had pretty PJ's. I was wearing some PJ's I had bought from the Op Shop for $4 a few years ago. Oh how I realised that I needed to upgrade my look. So when I got home I looked for flannel fabric online. Yes I could get some great stuff but at a great price, it would cost me more to make them than to buy a brand new pair at a normal store.

With that in the back of my mind when I was scavenging the Op Shop's I found a sort of nightshirt. It has birds and pink on a brown background. It was too split up the sides and too short to be decent to walk around the house in. But it was in exceptionally good condition and I could see that a few tweaks to it would make it look better. So for $4.50 I took it home.

But then I could not find material to match, until I was out in the garage looking at my material shop (that is what I call all my stash of fabric) and found a bit of leftover flannelette sheeting. I had used this sheet as the backing for one of my soft and cuddly kiddies quilts. Yes it was a perfect match for the pattern on my top and there was enough material left over.

So I chopped up an old pair of PJ bottoms (50 cents from the op shop) to use as a pattern. I cut it in half down the middle then leave one side sewn up so that I can use that as a guide to sew up my new bottoms and the other side I cut into pattern pieces. Cut them and sewed them. It only took about 1 1/2 hours in total to complete them. And I am so pleased with myself putting contrast piping around the bottom of the legs to make them look that they belong together. (Don't look too closely as one leg is definitely finished a whole lot better than the other leg). There I have it - a new set of PJ's to go to smart places in the winter in.


Total cost:
pj bottoms for pattern 0.50
pj top 4.50
piping 0.50 (remnant from Fabric Vision)
ribbon for waist 3.00 (from Blackwells in Kaiapoi)
elastic 0.10 ( I got a 20 metre roll at Stash Rehash this year)
$8.60

Wednesday, June 20, 2012

Stage one of bedroom done

Yes I have finished painting. In spite of the mishaps of yesterday (if you don't read Facebook - Aaron had tried to help and made a hash of it) all the paint layers are on and now just drying. I absolutely love it. Jakob has picked so well and when black curtains are up etc it will look fab.

I had learnt a few things from the painters at work. So this time I masked up all the edges, it was going to be so sharp in all the corners etc. What I did not take into account was that last time it was messy. So when I untaped the ceilings there was green, then wobbly bits of vivid blue and then the white stipple ceiling. Icky. So I had to undo all my professional edges and make them wobbly to cover all the existing blue. Ah well.   This is the first stage but at least Jakob can be back in this room tomorrow night. I have then got to move onto stage two - being curtains to match, quilt to make etc. So the next photo will be in a few weeks time when some of that has been achieved.

So now it is 9.55pm and the house is a mess as all my spare moments have been painting. Where do I start? kids lunches, vacuuming, folding the five loads of washing, getting the washing machine on.......... goodness it does not take long for things to get behind.

The giveaway winner is... Lusks

I had a bit of feedback re problems putting on comments. So I have taken off any restrictions as to who can access and comment and I have followed Pam from Kalamazoo in the USA advise to turn off the verification software at the end. Hopefully that will iron out any issues you may have had putting on comments.

So winging it's way to Scotland is the bag pattern and a couple of bits of material thrown in. I hope one day to see the finished article.


Tuesday, June 19, 2012

My thwarted surprise

Aaron was meant to be going away for work for three nights. We had a few weeks warning so the boys and I had been plotting and planning. To do a total revamp of Jakob's room. Out with vivid blue, the zoo curtains and the cream walls. In with a retro lime, grey (called concrete) and a white trim. Jakob also wants black curtains - the man at Resene's in Shirley was very impressed that Jakob had chosen such coordinating colours.

Anyway the story continues... The time then got reduced last week to just an overnight trip with a separate trip next week. Uh oh - but never mind now I will just have to paint till 10pm etc. So Aaron headed off at 7.30am and I dashed in to start the room. Moved the furniture, covered what was left, started puttying and sanding. Then at 9.30am I got the call!! The plane was fogged in, still might get a later flight. Oh panic stations*** - then another call at 10.30, no flight, coming home for dinner.
So what should have been an amazing surprise actually looked like this........
And I was going to make a quilt (well that is what I thought but doubt would get it done!!).

Sunday, June 17, 2012

Scissor keeper and pin cushions

Since Tuesday I have been making this set in an aim to assist me to stop losing things. When I am doing craft activities I am always trying to find my pins, scissors, cutters, rulers etc. At home we are still trying to find our wedding negatives (I have tidied up sooo much of the house in my search that I am started to look organised!).

Anyway I keep seeing people on YouTube videos who have things around their neck with their scissors on. Years ago when I was in the Canterbury Embroiderers Guild we were always making scissor keepers. I never understood it as they never "kept" my scissors near me. They were generally little embroidered square attached by a cord to your scissors so that the location of your scissors were more obvious. Didn't work for me.

On Tuesday when we gathered for a quilting night I kept waylaying my scissors all the time, so cut some 2 1/2 inch strips and started to sew. I mean, how hard could it be?

Well it transpires that you have to think about a lot of things, like not sewing the loop up and finishing cos you feel so jolly smart, then realising there is no way to put your clip on to keep the scissors (prototype 1 in the bin). Finally got the hang of the scissor thing and I have been using mine ever since. How did I ever survive before that. It is soooooo handy!!!!!!!!!!!!!!!!!!!!!

Then onto the pin cushion. I have made a finger one - which since trying it I actually like as I only ever use 3-4 pins if I use pins at all. The wrist one is on prototype 3 as the first was too small, this one I feel is a bit too big and is velcroed onto the wrist strap. I think that I will sew it onto the strap. Also the elastic is a wee bit too fitting. But it all works for me and I am thrilled. I am going to make some more to iron out issues.

So I have always sold the snips (or given them away) and now I feel it has gone to the next level with the lanyard.

Saturday, June 16, 2012

Clearing the craftroom - Giveaway

I am seriously clearing and tidying up the craftroom and my quilt shop (aka the garage) So instead of selling the excess I have decided to host some giveaways over the next few weeks. This weeks giveaway is ....


Melly and Me bag pattern - Hopscotch.


This has never been used. I have unzipped it and looked at the instructions but am just not going to make it.
So put a comment on my blog and make sure I know how to contact you and this could be yours, to keep or give away yourself.
This will be drawn in the evening on Wednesday and then could be winging it's way to you.

Upcycling - using second hand sheets

Last night I got on the finishing streak of upcycling various second hand sheets that I obtained from the Op Shop for $2-3 each.
I have been making duvet covers for our single beds as we just don't have enough in the winter when washing does not always dry. I like to use plain sheeting and am a big fan of natural materials, so it has to be 100% cotton and generally white. Then we don't need a top sheet to the bed as the cover operates as a duvet cover and sheet. Makes it easy for the boys to make in the morning and we don't get the whole - sheet down at their feet - scenario.
I made two white duvet covers last week and last night I made a purple one for Eli. It is his favourite colour.
By mistake I deleted the photo of the main finished duvet cover (and it is in the wash now).

Instructions; - sew four straight seams to make a duvet (takes 30mins max)


1. Get two single sheets or one double / queen (so that there are two layers and lay them on the floor. Make sure that the nice stitched top end of the sheets are both at the same end and if you have a wrong and right side then put them right sides together. As this means the bottom of your duvet is already made and thick enough to take either domes or buttons as closure.

two top ends of the sheet which will become bottom end of the duvet. All ready for buttons or domes.     
2. Lay an existing correct fitting duvet cover over these two layers. Put the bottom of the duvet in line with the top of the sheets and one side of the duvet in line with one of the sides of the sheet. This way you only need to cut to fit down one side (allow 3cm seam allowance) and along the end of the duvet.

3. Stitch both sides together starting at what will be the bottom of the duvet (that nicely finished top of the sheet. Then stitch along the top seam. This will make sure if you have cut it a bit wonky you can correct it, but the bottom opening of the duvet will still look professional as the seams will match.

4. Turn the duvet through so that the seams are all on the inside. Then iron those seams. Go back to the sewing machine and start on one side and sew to the top - sew with the side of the machine foot running in line along the edge of the duvet - , turn and sew along the top, turn and sew down the other side. This is called a french seam and means that you do not need to zig zag or get your overlocker out as it seals the original seam inside itself. It also gives a really good finish to the duvet making the edges always look sharp.

The finished look of the french seam
5. Close the bottom two edges of the duvet whatever way you prefer. Make buttonholes on one side and sew on buttons or use domes.


One finished duvet.

A gorgeous break in Rarotonga

Woo hoo, A holiday with no kids for 11 days. Bliss, relaxing and warm! BTW it was an early 20th wedding anniversary present to ourselves....