Showing posts with label recycling. Show all posts

Friday, April 12, 2013

Quilted and Bound

The boys declared the quilt very comfy

Aaron trying it out after work

Quilting
The quilting
Well the quilt for the caravan is finished. Whew and finally. Over the week I have been quilting it. I went for a sphere shape based around the diagonal seam. Never again. For a couple of reasons....
1. It meant the quilt went through my machine on a diagonal which was just too much bulk to push through the arm of the machine. Horrible to quilt - would do a cot or throw like this but never a bed quilt.
2. I like geometry- quilting this with a sphere shape takes away from the definition of the hourglass block and merges it more together. Now that is the effect you want on some quilts but not this.

The binding also should have been unpicked and redone as the larger part of the binding is on the back. But I had sewn the binding on by the time I realised and as this is for the caravan, therefore does not need to be perfect, I just left it as is.

So now Aaron and I have a flannelette quilt for our big bed and both the boys have ones for their beds. We will all be snug as bugs in rugs!!!! you can view the boys quilts here and here.

To look at the making process you can go to these posts on my blog.
pining out the quilt
patchwork finished
starting the piecing

I link to these places.

Follow on Bloglovin

Sunday, March 10, 2013

Refashion an Op Shop find

This weekend I physically exhausted myself in the garden (did not take long!!! - a couple of hours each day), which left me with heaps of time to sit and sew for relaxation.

Inspired by my recent finish of a recycled quilt  I went through the stack of unfinished projects by my machine. There was a dress I had bought about a month ago from a Save the Children Op Shop in Christchurch.

I am not very good at sewing clothes for myself from scratch, but if something fits I know I can generally make it look better.

One of the things that really bug me about ladies clothes is NO POCKETS - why why why. Yes I carry a handbag but it is so handy to have pockets. And why was there no fastening at the waist? - so it gaped - no dome or button or anything.

So I made a new collar, new sleeve end, stitched a pocket into the waistband but floats externally, shortened the length and added some bias, added a $1 belt also from the Op Shop and presto - A new outfit that I am thrilled with.

I wore it to church today and heaps of people commented on it.
$10 dress
$1 belt
$5.50 fat quarter of green and black flower material from quilters quarters in Rangiora

Refashion a dress
The finished article.
The before (sorry not good photo)

The before on my dress model

Worn to church this morning
icky 80's collar

off with the collar and half the sleeve


On with a new collar
on with a new cuff

Add an external pocket

jazz up the bottom of the skirts. Shorten by 1 inch and add bias
DONE - I link up to these places


href="http://thededicatedhouse.blogspot.com">
 March Finishes

Friday, March 8, 2013

Finally a finish

upcycling old Pj's

It has been most of summer since I managed to finish something. Yay, the quilt top for the caravan is DONE.  Well I still have to sandwich it and quilt it, but the patchwork is done. I love the repetition of the hourglass block. This is made with 100% recycled flannel. The white was a really good condition fluffy sheet that I bought at a local Op Shop for $3. The patterned material are all PJ's - again Op Shop purchases. (I have to say that I am a bit addicted to making flannel quilts, they are so soft and cuddly and making them from recycling just appeals to the frugal in me).
Finally I am able to link back to Finish it up friday. I also link up to places here.

Monday, November 5, 2012

I could not resist

You would think that I did not already have enough to do. I have a garage sale to organise for next weekend (yes I have decided that Aaron telling me to clear out does mean a big garage sale - my sister Anna is joining me with heaps of stuff), at least three waistcoats and goodness knows how many bow ties to make from the silk here.

I was ironing the silk tonight and got sidetracked. I could not remember which colours Jakob had chosen so I could not cut the patterns out. So I just kept ironing. This pile will become another 100% recycled quilt. This time a flannelette one. It will be half square triangles like the quilt I made for Alex, but in girly colours. This one is destined for the caravan for Aaron and I.

I had the pieces cut out, now they are ironed and ready to go. (I will need to cut more white, but hey why do that when I can do the fun sewing thing). Instead of marking my diagonal lines, when I have big squares, I just iron them and the iron mark works as the stitching guide. I find this a lot quicker than marking them in pencil or pen.

Linking to these places

Friday, October 26, 2012

The Grande Finale

I can finally say those words "it is finished". I have been trying to put this on my blog as a finish for the last two weeks. That is how long it has taken me (with a bit of camping in between) to get all the quilting done.

In my blog here - I explain how this was made from 8 businessman shirts all from Op Shops (Charity Shops). Even I doubted what a quilt would look like just from second hand shirts. I am absolutely thrilled.

I have never made a quilt before that is just block colour and I am very taken with it. Two nights ago when I was auditioning fabric for the binding I had patterned greens, multicolour and stripe material. Aaron did not like any of them and pointed out that introducing a pattern when all the rest was plain did not seem right. So I used the trimmings of the 100% cotton sheet from Ezibuy that is the backing, and had just enough to make a good solid binding.

I quilted this using freehand quilting but in straight lines, to give a bit more of an organic look to the quilt, rather than using my walking foot. Each cross is quilted in an appropriate colour quilting thread. Each cross had the quilting in the opposite direction to any crosses surrounding it.

Jakob

Eli
This quilt has been made for Jakob to go with his newly decorated room. It looks amazing in there and is even big enough to fit on the pull out sofa when guests come. It is big enough for my bed and I want it!!!

When taking the photos Eli helped and at the end Jakob told me to take a photo of Eli too so he did not miss out. I love his compassion.

Linking to FNSI - finally!!! and other parties here.

Tuesday, September 25, 2012

Upcycle a tray cloth


The finished bag
 A while ago I posted about some of my Opportunity Shop finds. I bought the tray cloth for $1.00 as it had lovely hand embroidery.

So this weekend I finally got around to doing something with it. I did not want to do a normal zip bag or purse as half the lovely embroidery would have been cut off. So I went from 1 tray cloth, 1 linen shirt, 1 cotton shirt, to this little bag to put things in (a bit of handcraft maybe).

The back - finished

Inside - finished
The three items I started with


Linking to these parties.

Saturday, August 25, 2012

Recycled super soft Angora into new born beanie


Well, today was sunny and spring is definitely on the way. In autumn I bought a 100% angora (rabbit) jersey. Unpicked it, washed it and reballed it. (if you click on those words you will see it was not such an easy job). Then I knitted a new born to 3 month old hat. It has been sitting in my knitting bag ever since. Not sewn up and no tassel. Finally last night I pulled it out and finished it. Why is it that when winter is on the way out that I get around to all the winter jobs?

This is a pattern that I developed years ago from an idea of the sleeve of a jersey I made (it had the ribbed look). In the last few years I can see that lots of commercial patterns are using this kind of ribbing too. Just when you think you are original!!

Anyway I now have bundles of wool, knitting needles and patterns all kitted up with this supersoft angora.
I will be listing it in my shop soon, I just want Alex to model it for me first.

Today I have been busy reclaiming more of the garden for my vege patch. Looking good but would like it to happen faster!!

Wednesday, August 15, 2012

Made - 1 Boys Merino Hoodie

The merino jersey before.
The finished product


Yes I am still in the recycling / upcycling mood. This merino hoodie was long in the making! The adage of measure twice and cut once was not adhered to. So a lot of unpicking and making do. It started as two ladies merinos. The light blue one was all stained down the front so only good for bits. The black one was a size 14!!! It was long enough in the body and arms but it would have to be a pretty skinny 14 as I did not need to adjust the width at all. I just chopped a bit off the bottom.

I measured the arms etc and thought they looked short - cut anyway and yes way too short. Thankfully I was doing new cuffs so that he could have the semi-glove look at the end of the sleeve, I just had to make that add on a bit longer than intended. The pocket was sewn and unpicked as I put it too high up the body, so had to take it down to a reasonable level. When cutting the polo neck off I mistakenly cut the shoulder seam too with the overlocker, so that had to be fixed. The hood was right the first time.

All that is needed is some domes on the placket.

Jakob loved being the model and has been pestering me for ages for one as he picked the colours in autumn, now we are only 2 weeks from spring (not that you would guess it from the weather we have been having).

Eli's one last year - here- only took me 1 1/2 hours. This took me two nights with a gap of three in-between as I got frustrated with the mistakes.

Tuesday, August 14, 2012

A Quilt made from 8 business shirts

The big quilt and the cushion cover
The shirts before cutting.
I was in the Op Shop a few months ago and they had all menswear at 1/2 price. In the rack all coordinated and calling to me were 7 business shirts. I had no idea what to do with them, being very plain bold fabrics, but had to have them for my stash. At $2 for 100% good quality cotton how could I resist?

Then I started the remodel of Jakob's room and realised that the colours would fit perfectly. Then the pattern decision. Well I have seen a few cross patterns out on the internet, all made from squares, and thought that would do. Of course I did not do what everyone else has done and that is to have squares so that each cross takes 5 squares to do. I just cut big strips and then cut some into squares and some into longer rectangles that are the equivalent to 3 squares. Why have more seams than you need? I cut heaps out and just used my eye to guess how much I needed. I was worried that I would have enough fabric but I actually have way too much.


Then it was just a matter of laying it all on the floor and sewing it. The laying and sewing only took me about 31/2 hours. I started at 9pm and finished at about 12.15pm. But was so awake that I then started cutting smaller strips for a matching pillow!


So what you see is just the patchwork top cut in 6.5inch strips and the matching cushion cover which was cut in 2 1/2 inch strips. (And I have way too much fabric left over!!!).
Jakob's remodeled room

Once I get around to sandwiching it then I am going to practice quilting by doing each cross in individual patterns. (that is the plan at the moment anyway).

And doesn't it match the colours in Jakob's room!!! I am thrilled with it, especially as it really looks more boy like.

Linking up here.  MightyCrafty.me


Friday, August 10, 2012

A boy's quilt - from recycled Pj's

The front
 Finally I have finished the quilt for Alex. Oops 9 weeks after his birth and it was meant to be his coming home from hospital present!!!! Hmm. Funny timing too as tomorrow is Mieke's birthday party (his big sister is turning 2) so I have finished a gift for him but not for her.

I do seem to have things a bit back to front at the moment. I have had to sneak the finishing of this in while my boys are asleep because I promised them that I would not sew anything else until I had sewn their merinos. Goodness those were meant to be made in Autumn and it is nearly spring.

Anyway this quilt is made from a myriad of second hand pajamas. All purchased from second hand shops. If there is not a matching set I find I can pick up a top or bottom for about 50 cents. The blue is new though as I had to find something consistent to put with the variety of patterns. It is just flannelette sheeting from Fabric Vision for $7 per metre.

The block pattern is called a few things - quarter square triangles, hourglass etc etc. I made the quilt top, backing, sandwiched it together and quilted it, all at my weekend away. The backing was made from a bit of Thomas flannel that I had bought to do something for my boys, but I did not get around to it and they are well over Thomas. I quilted it by just doing stitch in the ditch on every seam, that gives it enough holding power to go through the washing machine and retains the great geometric pattern. I pulled it out yesterday to show Steff and was surprised to find that I had not done the binding. So a late night job and it is done.
The back


Monday, August 6, 2012

Bags from bits and bobs

I wanted some bags to hold various craft items - my selvages, buttons, zips, bias binding, tags, ribbon...... I finally got around to making a start. I made two bags on my recent retreat. One for buttons which I have decorated with various antique and found buttons and the other bag for my selvage edges. They both started with the same base, the sleeve from the 100% linen shirt that I made the cushion from. So that shirt is now used up completely.

These bags are not big but are perfect for the use I wanted. Fully lined using left over bits of quilting material. Not to sure about the handles though.

Tuesday, July 31, 2012

An awesome apron made from a man's shirt

Finished like this
I saw on facebook a photo of someone who had made a country man's shirt into an apron. I am a big apron fan myself and have always kept that idea at the back of my mind. So while I was away with the material girls at our retreat, this was one of the first things I did.

Started as this
My shirt was a gorgeous 100% cotton cufflink shirt. So I cut the sleeves off, then the back and the cut on an angle from the armpit to partway up the collar. The collar, cuffs and back facing had a lovely contrast colour. I used the contrast from the back facing to make binding for one side and one cuff facing to make the binding for the other side. I used the last bit of cuff facing to make the pocket. One sleeve became the ties. Viola an apron that I really like (I am wearing it while I type this.)

Thanks to Glenis who makes a great official photographer.

Friday, July 20, 2012

Upcycling - 100% eco Patchwork quilt

There are so many quilts out there that are "scrap" quilts but you still need to buy a lot of material, batting, backing etc to complete it. So I decided to buck the trend and make a true scrap quilt. All from left over bits, recycled bits, others rubbish.
Today I spent the time making the basics of the quilt sandwich. So I made the top - out of three bits of sheeting, the backing was also made this way. These bits of sheeting were sheets purchased from the Op Shop for $3 or under, I made them into duvet covers for the boys. But the bits were left over. So I sewed them together in strips until they were big enough for a lap quilt. Then I used all the leftover scraps of batting from other projects. This took five pieces sewn together.


The picture is me putting the quilt sandwich together. So there is a scrap top, scrap batting and a scrap backing. You can see all the seams on the photo but I am hoping that at the end this will not show through. I tried using basting spray for the first time (instead of pins), it took a lot more spray than I thought and it was not as successful as I hoped. May have to revert to the pinning effort.

Anyway - I am going to use bits that I pick up from the various quilt gatherings I go to. I hate seeing waste and at a lot of places I have picked up quite large quantities of material from the bins. Generally I use those bits to make quilts for the orphanage in El Dorat So it will be stitched as a raw edge piecing and will be interesting to see how it turns out. I will keep you posted.

Thursday, June 21, 2012

Recycling / Upcycling project - glamorous PJ's

When I was recently away at Hanmer Springs with friends they all had pretty PJ's. I was wearing some PJ's I had bought from the Op Shop for $4 a few years ago. Oh how I realised that I needed to upgrade my look. So when I got home I looked for flannel fabric online. Yes I could get some great stuff but at a great price, it would cost me more to make them than to buy a brand new pair at a normal store.

With that in the back of my mind when I was scavenging the Op Shop's I found a sort of nightshirt. It has birds and pink on a brown background. It was too split up the sides and too short to be decent to walk around the house in. But it was in exceptionally good condition and I could see that a few tweaks to it would make it look better. So for $4.50 I took it home.

But then I could not find material to match, until I was out in the garage looking at my material shop (that is what I call all my stash of fabric) and found a bit of leftover flannelette sheeting. I had used this sheet as the backing for one of my soft and cuddly kiddies quilts. Yes it was a perfect match for the pattern on my top and there was enough material left over.

So I chopped up an old pair of PJ bottoms (50 cents from the op shop) to use as a pattern. I cut it in half down the middle then leave one side sewn up so that I can use that as a guide to sew up my new bottoms and the other side I cut into pattern pieces. Cut them and sewed them. It only took about 1 1/2 hours in total to complete them. And I am so pleased with myself putting contrast piping around the bottom of the legs to make them look that they belong together. (Don't look too closely as one leg is definitely finished a whole lot better than the other leg). There I have it - a new set of PJ's to go to smart places in the winter in.


Total cost:
pj bottoms for pattern 0.50
pj top 4.50
piping 0.50 (remnant from Fabric Vision)
ribbon for waist 3.00 (from Blackwells in Kaiapoi)
elastic 0.10 ( I got a 20 metre roll at Stash Rehash this year)
$8.60

Saturday, June 16, 2012

Upcycling - using second hand sheets

Last night I got on the finishing streak of upcycling various second hand sheets that I obtained from the Op Shop for $2-3 each.
I have been making duvet covers for our single beds as we just don't have enough in the winter when washing does not always dry. I like to use plain sheeting and am a big fan of natural materials, so it has to be 100% cotton and generally white. Then we don't need a top sheet to the bed as the cover operates as a duvet cover and sheet. Makes it easy for the boys to make in the morning and we don't get the whole - sheet down at their feet - scenario.
I made two white duvet covers last week and last night I made a purple one for Eli. It is his favourite colour.
By mistake I deleted the photo of the main finished duvet cover (and it is in the wash now).

Instructions; - sew four straight seams to make a duvet (takes 30mins max)


1. Get two single sheets or one double / queen (so that there are two layers and lay them on the floor. Make sure that the nice stitched top end of the sheets are both at the same end and if you have a wrong and right side then put them right sides together. As this means the bottom of your duvet is already made and thick enough to take either domes or buttons as closure.

two top ends of the sheet which will become bottom end of the duvet. All ready for buttons or domes.     
2. Lay an existing correct fitting duvet cover over these two layers. Put the bottom of the duvet in line with the top of the sheets and one side of the duvet in line with one of the sides of the sheet. This way you only need to cut to fit down one side (allow 3cm seam allowance) and along the end of the duvet.

3. Stitch both sides together starting at what will be the bottom of the duvet (that nicely finished top of the sheet. Then stitch along the top seam. This will make sure if you have cut it a bit wonky you can correct it, but the bottom opening of the duvet will still look professional as the seams will match.

4. Turn the duvet through so that the seams are all on the inside. Then iron those seams. Go back to the sewing machine and start on one side and sew to the top - sew with the side of the machine foot running in line along the edge of the duvet - , turn and sew along the top, turn and sew down the other side. This is called a french seam and means that you do not need to zig zag or get your overlocker out as it seals the original seam inside itself. It also gives a really good finish to the duvet making the edges always look sharp.

The finished look of the french seam
5. Close the bottom two edges of the duvet whatever way you prefer. Make buttonholes on one side and sew on buttons or use domes.


One finished duvet.

Saturday, June 9, 2012

Make a gorgeous cushion from a shirt

I have just finished making a lovely cushion from a second hand linen shirt. I bought the shirt for $2 specifically to do this. The inner is a Fairydown feather inner - 16x20inches.


Here is how I did it:

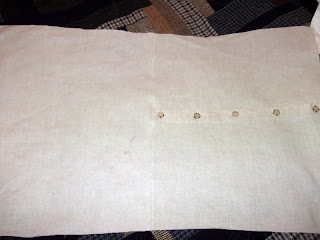
1.Get a cushion inner the size you want. Have a shirt in the material, colour and style you want. Make sure it is a button through shirt not a pull on.
measure shirt for cutting
After cutting
2. Place the cushion on the well ironed shirt (buttoned up) and cut out around (so that you are cutting two layers at the same time) - don't forget to allow for seams. Or measure your cushion size, add seam allowance and then cut that out of the shirt

3. Sew the top seam only so that the material becomes a oblong.

4. Add all the embellishments that you want. Sew them along the full length of the material and then it will cover both sides of the finished cushion.
Front

Back - with a perfect opening 

5. Fold the trimmed material in half along current seam line - right sides together. Sew around the other three sides. Then unbutton the buttons, turn inside out and press. Viola your finished cushion. With a perfect opening, professional button holes all matching up - without having to do the hard work yourself.

A gorgeous break in Rarotonga

Woo hoo, A holiday with no kids for 11 days. Bliss, relaxing and warm! BTW it was an early 20th wedding anniversary present to ourselves....