Tuesday, August 13, 2013

It just happened

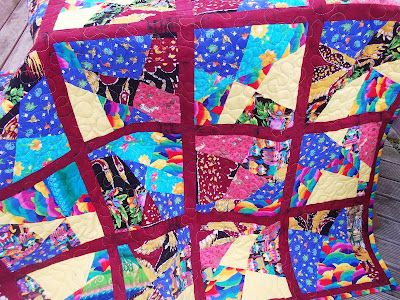
Another quilt for Hope Homes International

Showing the borders
This is the first time ever that I have been surprised to finish a quilt. A while ago I found the middle blocks at an Op Shop (charity store) for $5. When I took them home to turn them into another quilt for Hope Homes International, I found that I was struggling to get material that would go with the blocks.

While on my quilting retreat, at Living Springs, Hazel passed me some leftover strips from one of her gorgeous quilts she made. As soon as I looked at the material I knew that it would go well. Thanks heaps Hazel.

So yesterday I had an hour before the kids came home from school. I pulled out the ironing board and ironed and sewed some seams. Then I rifled my stash for another material to make it bigger (the big bright outside border) - cut some 5" strips, sewed and realised that the quilt was heaps big enough. Just like that!

All I need to do now is sandwich it and quilt it (and bind it...... oh it will take a bit more time). I felt very productive.

I link to these places.

Sunday, August 11, 2013

The Linen project with the Make Cafe

This is the lovely bundle from the Make Cafe for the Linen Project
Well over at The Make Cafe the challenge went out to make a Zakka style something with a wee pack they made up. This was to celebrate them stocking a new linen range. So I popped over to their website (Sew Pretty) and purchased a pack. For only $12 I got half a metre of linen plus three little pop fabrics.

I have added three of my own and a bit of other decoration. I am actually going to make two of the same thing as I have two baby showers to attend in the next wee while. So the plan tonight is to get it all cut out and sorted as there is a bit of hand stitching to do.

I love the Make Cafe and the awesome prices at Sew Pretty (this post is NOT a sponsored post)

The bits that I have added

DIY in my DNA

NOT!!! But today I have been trying out my DIY again. I am pretty happy with the result. I cut, measured, sawed, sledge hammered and nail hammered. As a result I have a pretty square netting support. It is in an L shape along the fence.

 This will have bird netting over it in the summer to protect the red, black and white currents nestling under it. No more pegs and cloth getting caught up in the bushes.

This is my best DIY yet. Another job which I have procrastinated for about 5 months but really only took an hour.

I am pleased but the whole time I had Aaron telling me, that is not right, don't use the hammer that way..... aye aye aye....I told him to go away as I do believe that I have done as good a job as he would have!

I link to these places.

Saturday, August 10, 2013

Black and White Quilt done.

Last night I worked on quilting and binding another quilt for Hope Homes International. The quilt was made from a pile of blocks given to me and other black and white material. Thanks heaps Julie.

I was a bit worried that it looked quite adult so I fished through all the donated material and found the soft cuddly flannelette. A dramatic contrast to the quilt top but it makes it a lot more child friendly.

The quilted verse
On the blue borders I quilted "Your word is a lamp unto my feet and a light unto my path", a favourite verse of ours.


The bright backing
I link to these places 

and finish it up friday with Amanda- Jean

Thursday, August 8, 2013

Shirt Apron - How to

A while ago I posted the beginning of my Xmas present making and it was for a shirt Apron. This is a apron made from a recycled business man's shirt. I now am the proud owner of a Pierre Cardin apron!!

When I made it a lot of people were looking for a tutorial. So two weeks ago when I was on my quilting retreat with the Material Girls, I made the last four shirt apron's. I took some photos and what follows is my tutorial for how I make them.

First start with the shirts you want to turn into Aprons. I only use 100% cotton as I know how it reacts and it is easy to clean. Find some bindings or ribbon that you can use for ties and to bind two seams. Also get any other decoration etc you may want.

Cut the side seams from the bottom of the shirt to the armhole. Cut along the stitching on the edge that is the back of the shirt. You want the stitched and neatened seam to remain along the side of the apron so that you do not have to do anything more to finish that area.

Cut from the bottom of the armhole to the seam on the shoulder. Draw and cut a straight line to the collar.

Once cut it should look like this. Do the other armhole.

Cut the shirt back and yolk off the collar from one side to the other. Again cutting just under all the seaming for the collar so that you do not need to do anything more to finish this area.

Your shirt should now look like this. If it had an amazing label like Pierre Cardin etc then I remove that from the collar or shirt yolk and restitch it somewhere obvious on the front. 

Use the sleeve of the shirt to make a pocket. This is the shape I tend to use. If it is a short sleeved shirt you can use the cuff of the sleeve for the top of the pocket. If not then cut your shape and turn the top down and stitch in place. Add any trims you want and stitch them in place. Fold under the sides and bottom and iron down flat.

Put the pocket onto the left front of the apron and pin in place. Stitch the pocket on - I tend to do a double row as it secures it well and looks smart.

Bind the edge of the shirt where the sleeve was removed. Bind from the collar down to the side seam. You can use Bias binding, or fold under and use ribbon or make some binding from the back of the shirt.

Add ribbon or binding or whatever you have to the side as ties. Make sure they are a good long length for tying around.

Shirt Apron
et Voila - you posh finished shirt Apron (you can see on this one that I also put ric rac on the breast pocket. But the world is your oyster when it come to embellishing.

Do let me know if you make any. I link to these places.

Wednesday, August 7, 2013

Sorting all the notices

Now a lovely organised wall
Oh my goodness. How many notices do children get? Some for sports team, some for swimming, some for activities and school trips, some for special sports days, some for activities occurring during the term, some for reading suggestions and on it goes.......

This was held on by blue tack


This was sitting on the floor!
I have notices in a big muddle, stick them to the bottom of the calendar, put some on a very wonky clip and piles on the fridge door. But not any longer!!

I covered three clipboards with scrapbooking paper and then used 3M picture hangers to put them on the wall. Labelled - Family, Jakob, Eli.

Before I did that I used decal paper that is blackboard to cover the section of the wall for notes and shopping. I really want to blackboard paint it but Aaron was not keen. So the decal paper works well but is removable if Aaron really does not like it. If it gets his seal of approval then I can blackboard paint this at a later stage.


All this is happening as I want a tidy kitchen area. I have things all over the show as EQC finally paid us out and I have plastering happening in the kitchen, lounge, laundry, hall and bedroom. Soon I will be very busy painting!!!!

I link to these places

Saturday, August 3, 2013

Pracrastination - 1 1/2 years...... time to fix 3 minutes!

Can you believe it. I have been trying to finish jobs. Not only crafty ones but around the house, outside, in the garden etc. I never used to be a procrastinator but now I am. (some of that is I would rather spend the time with Aaron or the boys or doing crafting).

So today I stopped procrastinating on three things;
Procrastination - at least 1.5 years, frustration - HUGE, fix 3 minutes
Oh my goodness, this is the wheel to my laundry basket. Every time I have used the laundry basket, for at least the last 1.5 years but possibly more, I have had to reattach the bolt the holds the frame together before I could use it. Then yesterday the wheel fell off too. So today I fixed them both. Think of all that time wasted putting the bolt in every time.

Procrastination 6 months, fix 10 minutes
This is the wiring for the wisteria. I have two white wisteria climbing up the deck roof. In Autumn I put in the screws and wired up the other side of the roof for that wisteria but ran out of hooks. I did buy more pretty soon but NEVER finished the job. A small job and no problem, but I had to get things from the garage to do it and I was just too plain lazy!!

Procrastination 4 months, fix 1 minute, Frustration - daily
My father made me this very comfortable kneeler to use when gardening. I love it as our paths around the garden are river stones and this is soooooo comfortable. The handle came off. I put it on the deck, two months later I put it in the garage. Only now have I found longer screws and put them in - guess what? I also did it to the other handle as it was looking wobbly and another 4 month procrastination is just not right!!!


Friday, August 2, 2013

Trying to challenge myself

While away on my quilting retreat last weekend at Living Springs, I had these quilt to finish off quilting and binding.

Because they are all charity quilts I do want to do them quickly, so I end up in a rut and either stitching in the ditch or resorting to my standby of stipple.

By the time I got to the third quilt I decided to try something new. A random flower that had been very well explained in a blog I follow. I have been trying to find it - I thought it was at Cluck Cluck Sew but can't locate the blog post. (if you know it please let me know so that I can link back).

Anyway I decided to do that on what was otherwise a plain strip quilt. It did not take too long for the quilt pattern to be looking consistent, so I completed some single flowers and some doubles.

Yay now that is three more quilts completely finished.

I link to these places


flower pattern
double flower

Single flower

Wednesday, July 31, 2013

I should have finished ... but instead I started

Well I was away on my quilting retreat. Blissful five days. Ahhh......

I should have finished heaps of things. I did finish some but then got fed up with doing what I should do and not doing what I wanted to do.

So I started

A paper pieced really large star. I am thrilled with it. I got the idea from someone who blogged about an absolutely enormous star that completed made a huge quilt. This will have to have a lot of piecing around it. So you will see it over the next wee while as I go about finishing it.(Did I say that finish word??? Wow remarkable)

A new quilt for our bed. I was trying to make it "manly" so Aaron would be happy sleeping under it and so far he does not like it!!


A million half square triangles to iron and trim!!!


Saturday, July 27, 2013

a baking holiday

Well these holidays I have been concentrating on keeping the kids in the new routine of them both baking once a week and helping with making an evening meal.
Jakob has made white and milk chocolate cookies
I made meringues - all the time thinking of Kerryn

Eli made tan square

We had old fashioned doughnuts for afternoon tea one day

I have just finished the birthday cake
With the leftover eggs and the
abundance of lemons I made - Lemon curd


I link to these places

Friday, July 26, 2013

Boys Basketball Birthday Cake

basketball cake
The basketball cake

I have done it!!! Wow this is a lot of firsts for me. First time I have made buttercream icing. First time that I have used piping and chocolate for decoration and first time that I have tried to make a modern fondant cake.

I had gone to a cupcake icing class at the Make Cafe and loved it. But the buttercream icing was already made and it helped me feel confident with fondant for little things. But this was a big thing.

The cake vs the real ball


My friend Steff has been so incredibly helpful and if it was not for her I do not know how it would have turned out. She gave me a recipe for the icing and let me use her food colouring gels. Also gave me instruction on how to make the orange look dark enough for the right basketball colour. Also little tips on making grooves for the chocolate stripes. She gave me the confidence to go ahead and I have to say that it was heaps easier than I expected.

It is not perfect but I am thrilled!!

I have previously made cakes but just with normal icing or following my Mother-in-laws system of royal icing etc. So there has been aeroplane cakes, treasure chest cakes, lego cakes.

I link to these places.

A gorgeous break in Rarotonga

Woo hoo, A holiday with no kids for 11 days. Bliss, relaxing and warm! BTW it was an early 20th wedding anniversary present to ourselves....