Showing posts with label upcycle. Show all posts

Monday, December 19, 2016

Chair upcycle with Chalk Paint and oilcloth.

Annie Sloan
All painted and finished
Before - tired after years of use
Last weekend while Aaron was in Australia I took the opportunity to attend an Annie Sloan Chalk Paint workshop at one of my favourite stores, Femme de Brocante.


The three hours was a great creative retreat. We looked at all the paint colours and talked about mixing etc. Plus we experimented with different finishes on a pre prepared board that we got to take home as a reminder. Plus we received the new Annie Sloan book. I thought I was just getting some painting and waxing know how. Great value for money.

oil cloth
I attended the course because there are several items I wish to revamp at home and I wanted to make sure I did it well. While I was in the store I found some lightweight oil cloth with maps on it. They are not accurate but look effective. Our study area is going to have topographical maps on the wall as wallpaper and I thought this would be a great way to do up a tired chair. 
Very tired chair
Chair and seat all done.

The chair that I decided to tackle first is actually one I upcycled years ago. Using an old velvet curtain to cover the seat. So I recovered the seat with oil cloth and then used chalk paint that is half old white and half provence mixed to make a softer blue to match the seat cover. Super thrilled with my first effort.

Linking to these places and Crazy Mum Quilts

Tuesday, December 13, 2016

Making pillowcases

This could also be labelled - A bit of upcycling. I was at the Op Shop (charity or thrift shop for those overseas) and found two high quality, but marked, white cotton sheets for $2 each.  The sheets were cut up around the marks and now two high quality pillowcases for his new pillow are wrapped and under the tree.
For Christmas I have bough Eli a super sized pillow. The photo shows the difference. But could not find pillowcases anywhere at a price I am prepared to pay. With the leftover I made a triangle pillowcase for my pillow on my bed. 
This photo is it just being cut out. After making the first one I remembered how easy pillowcases are. So I may use the other sheet and update our tired and old pillowcases.

Linking to these places and Crazy Mum Quilts.


Saturday, July 9, 2016

A refashion - Merino Swing Cardigan

From This
refashion, cardigan
To This

I bought the long cardigan from an Op Shop (Charity Shop) for $9 as I loved the colour. But I did not like the fact that it was made to have a big gap at the front. Winter here is too cold for that. And the length was just not right for me. I love the gather on the sleeves. So I chopped. Jakob was horrified and told me that I should not and then I realised I chopped it too short. So out came an old grey jersey which got sliced and diced too. I have been really inspired with my overlocker being fixed. Though it took ages to get the tension right when I changed threads. Why are those machines so hideous??!!! I follow a blog by Jody Pearl about reinventing fashion. She had a fabulous tutorial on how to make a small cardigan into something funky that fits. So I followed that and inserted triangles of Merino under the arms, then put on the grey border and finished it with a doubled over merino strip. I love the length.
From this
To this

Linking up to these places and crazy mum quilts


Friday, June 10, 2016

My latest upcycle

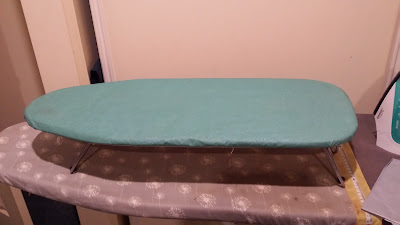
I am thrilled with this upcycle but when I went to show it to Aaron....hmm...how many ways can a husband be polite when he just isn't riveted? How can you not be excited by an amazing travelling ironing board?
revamp an ironing board

I found the small board at our local dump shop and paid a huge sum of $2. I need a board for my yearly quilt retreat. I added two layers of wool batting as it was sitting on metal mesh. Then I raided my canvas fabrics. Drafted a pattern sewed and Ta Da! I love it. The fantastic thing about it is that the legs fold away and it has a hanger. So when not in use you just hang it in the cupboard.


Looking forward to being fully equipped on my next travels.

Linking to these places.  and Crazy Mum Quilts

Monday, February 15, 2016

Thrilled with the refashion


I went from a stack of linen shirts and jackets, all from Op shops at a total cost of $8
To a casual colour blocked shift dress. I used a dress that I enjoy wearing and overlaid it as I cut items for this. That pattern worked out quite well considering I did not even make a paper pattern.  
I really like natural fabrics being linen, cotton and wool. This being 100% linen shirts has made it a bit stiffer than the shift I modelled it off. I need to start thinking about the flow of material. Recently I have purchased a few "fake" material tunics and the drift about the larger body frame rather nicely. 
I was really struggling to get enough dark material for the bottom of the dress so made a bias binding and used that for the hemming 
Absolutely thrilled with the secret pockets in the front of the tunic. I get really annoyed that ladies gear often does not have pockets. What to do with my phone and car keys? Drives me nuts. So these are quite deep. 
Now I have some sleeves and lots of buttons to do something with. Can't waste a thing. 
This has been on my to do list for about two years. I put it onto this quarters projects to finish with "2016 finish a long" to motivate me. And yay it is done.

2016 FAL as well as these other links and now a new link up with one of my favourite refashion blogs "Sew Outside the Lines"


Monday, July 20, 2015

Making a homework station

We are slowly settling into our new house. The last box was unpacked in the weekend. Now I am starting to look at how the house is organised.

We had a lovely piece of Rimu which had been taken out of a house being renovated. Then I bought two old pot plant stands which (for some odd reason) had the top pieces taken off. I found them at our local second hand barn. Haggled a great price as they were in the corner covered in dust.
Aaron was dubious about my plan so I set it up to show him how wonderful it would be.
recycle old shelves
A few days later the skillsaw came out and the wood was cut to the correct size - Yes in the middle of the dining room just after I had vacuumed - need I say anymore?
Then instead of using dowel etc I used heaps of L brackets to screw the legs onto the Rimu shelf.

 And voila we have a very handy homework station. Still a bit of work to do to get it how I want it exactly. But in working order with a laptop, monitor and keyboard as well as all the essential pens, rulers etc.

I link to these places.

Tuesday, June 30, 2015

Whipping up some Merino Kids trousers

My brother in law and all the family came over on Saturday. After a bit of discussion about how difficult it was to find trousers that fit wee Alex, I decided to jump on the sewing machine.

Only 15 minutes later he had a new pair of Merino trousers. Get an adults jersey - this was a old fashioned cardigan. Cut the arms into leg patter shape at the top. Do not cut down any other seams and make sure the cut leaves enough leg that it becomes the hemmed bottom of the trousers.


Cut a waistband and sew it on with the appropriate length of elastic. Voila. A very happy three year old.
I link to these places

Monday, June 1, 2015

Upcycling - Gorgeous 100% Cotton Duvet Cover


 Eli has a new bed (our old Queen bed) and I found a feather duvet at a Thrift Shop for just $10. It is a good brand but looked yucky and I knew it would wash up well. The duvet is just a king single so sits nicely on top of the bed.
Then there was the problem of a duvet cover. So I rummaged through my stuff and found two 100% cotton single sheets. With a bit of trimming in length these were perfect. Sewn together and then domes put on. I like a crisp finish to things so I completed the edges as French seams.
One of the sheets was $4 from a Thrift Shop and one was given to me by my sister. An old (1950's) sheet set that had never been opened. So gorgeous feather duvet and cotton cover for just $14.


I link to these places

Sunday, May 17, 2015

How to make a cutting table - a bit of upcycling

Take one really manky Rimu set of drawers that were cut off a wardrobe and good for nothing. Ask the second hand dealers to screw a top on that is 1/2 inch bigger than my cutting board. $60 later and we are ready to get started.


Get stuck in with the sander, make sure you get dust all through the garage, all outside and over everything. Remove the handles of the drawers before you do the draw fronts. Grunty 60grit sandpaper is the way to get the varnish off. Then go down to smooth as a baby's bottom 180 or 200grit.
recycle rimu drawers
Use plain vegetable or canola oil and oil all sanded areas really well. Clean out all drawers etc.
Patchwork cutting table
Put a Scotty Dog oil cloth that you bought from HERE onto the top with a staple gun. Tuck it under well so that no one sees the work.


Put some gorgeous paper in each drawer to line it and then stand back and congratulate yourself. I am so thrilled with this it is not funny. Now it is time to sort out the mess that is my craft room to be.


Saturday, May 2, 2015

Karen "The Tool Woman" Schulz

There were many other names for the title of my post which I auditioned -
"This is how I relax before I go to sleep" (referring to me starting and completing this at 10.30pm in my PJ's).
"I normally start a DIY and then get my Father in law to fix it". A very common title for me to use but could not use that title as I did it all myself!!!
"How to make a fish smoker for $2.50".

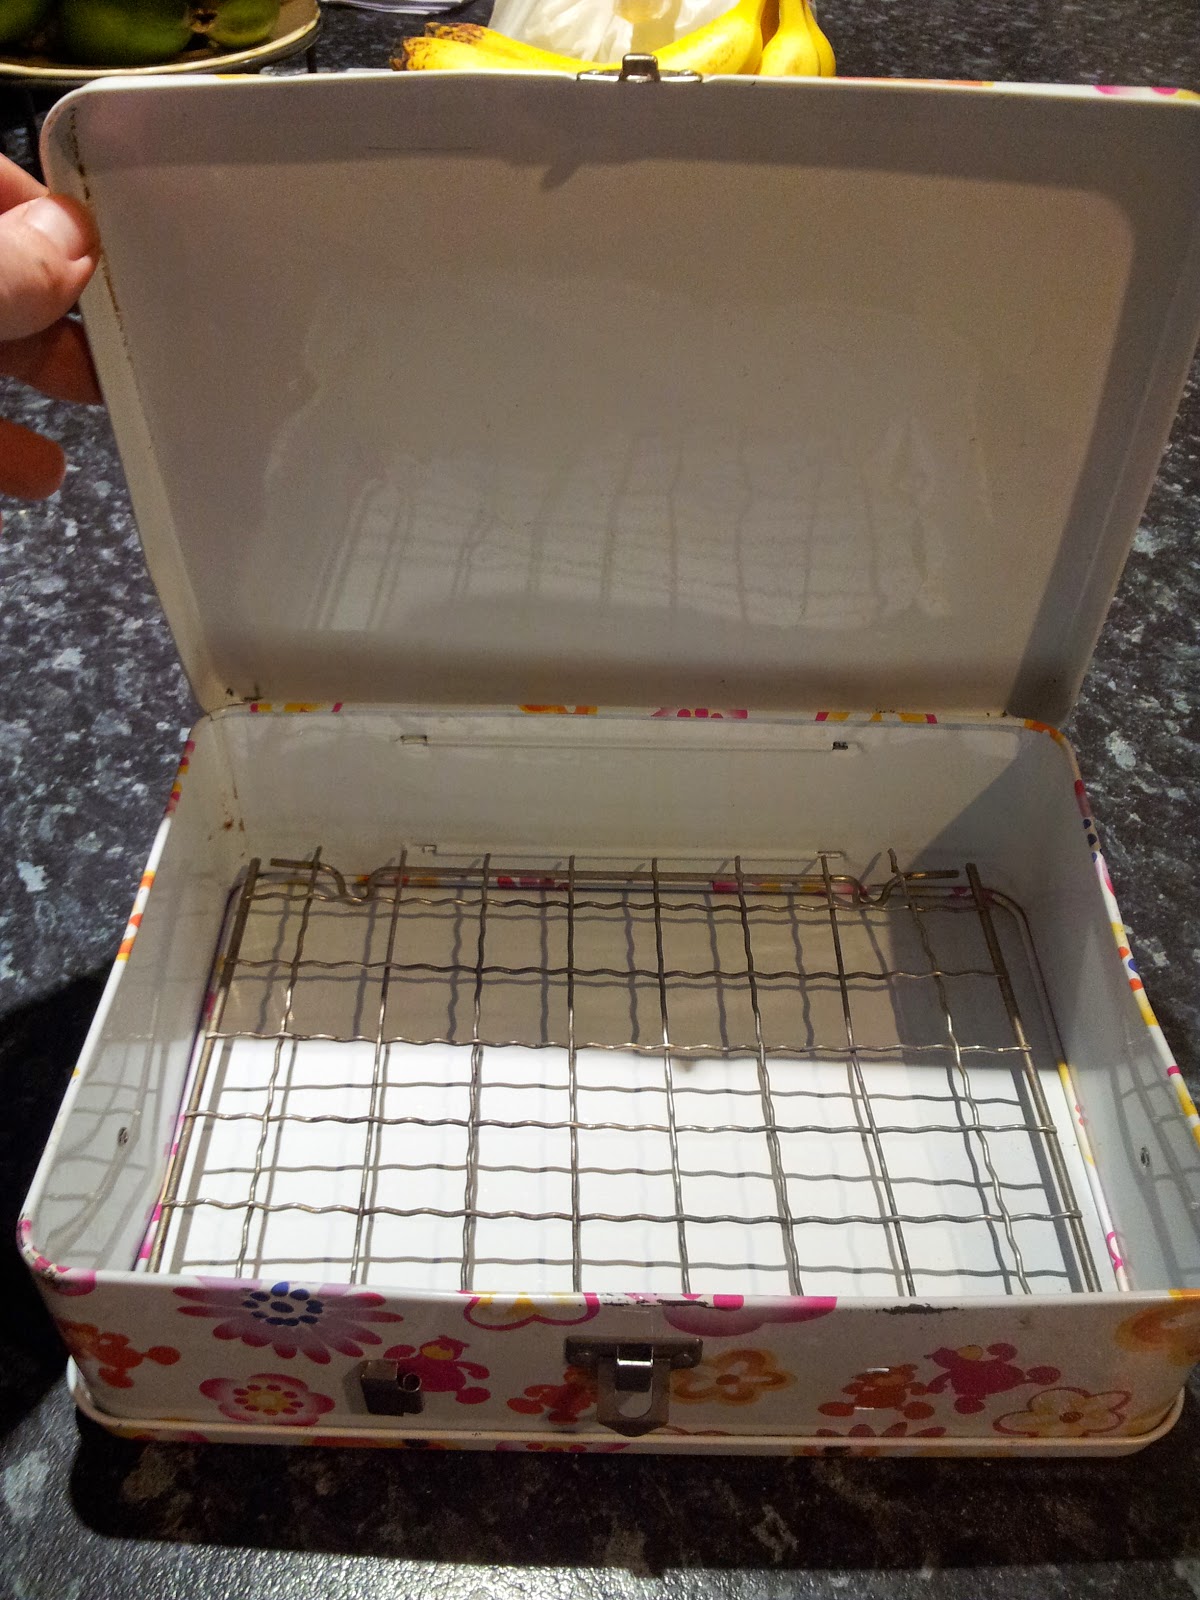
So at 10pm (after a hectic day spending the price of a small car on various items for our new house) I had started making a fish smoker. And I finished making it 10 minutes later, which is just as well as all my family-in-law are over for lunch tomorrow as a thank you for helping us move. And I am making smoked salmon.
upcycle, recycle
And yes you read a title correctly. I made this for $2.50. The metal lunch box and the cooling rack coming from the same Thrift Store at this bargain price. Due to all but one latch being broken it would be hard to sell it at all. When I explained to the shop that I needed a metal cake tin or similar for smoking fish I think they thought I was mad.
Anyway referring to the title of the blog - I have to fake my amazing DIY skills as I have NO IDEA what the name of some tools I wanted to use were. But have since found out that it is a wire cutter (grr do you know how many years I cut chicken wire with  - not sure the tool name but they are like pliers but with a cutting edge - only to find out that we had a special tool for this that took seconds to do and not hours!! sigh) and a hacksaw.
smoking fish

Cut the cooling rack down to size, put it in the tin, add some manuka shavings and we will be on fire tomorrow.

I link to these places.


Tuesday, November 12, 2013

What I am working on.

Happy Birthday Sarah
 Firstly the boys and I took a bit of time yesterday to pick and arrange the most gorgeously scented Peonies etc for lovely Sarah. It was her birthday and she is still living in EQC temporary accommodation 3 years after the earthquake, so we took this gorgeous bunch to her.


Starting the bodice section
The back detailing


Once we got home I started sewing again. I am attempting to make a dress for Kerryn's wedding from three Op Shop items. A $10 skirt, a $0.50 shirt and a $2 tunic top. It is taking me a while and I have only been sewing late at night (which is more difficult). But so far I am pleased. So here is a wee shot of the start on my dress dummy.
The linen shirt whose sleeves took my fancy
The $2 linen tunic
The $10 skirt
The cute sleeve detail that I really wanted to keep
I link to these places

A gorgeous break in Rarotonga

Woo hoo, A holiday with no kids for 11 days. Bliss, relaxing and warm! BTW it was an early 20th wedding anniversary present to ourselves....