Showing posts with label refashion. Show all posts

Saturday, November 23, 2013

Wedding refashion done

This morning I finished all the hand stitching of the facings etc and the dress is done.
Wedding outfit
The front
 It makes me feel like the middle of summer, bright and cheery. Aaron did comment that if the entire top was orange instead of the pink it would look better. I have to agree, I think it does look a bit cut up. But I really wanted the sleeve detail that was in the pink top.
The back
 Yesterday after I finished the sewing I got desperate for shoes. So in a fit I went to the three local Op Shops and thanks to the Methodist Mission I have white shoes to go with it for $4.
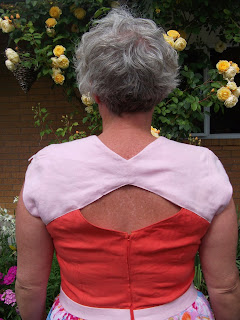
The back detailing
So this dress has cost me $12.50 plus the shoes and a blue cardigan I got a couple of years ago for $4.

Here is a reminder of what I started with - A orange linen tunic, A pink linen top and a almost floor length floaty skirt.
I used the cap sleeves
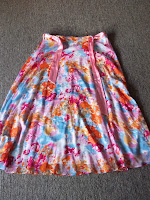
This was cut down

This is the main top


All I need to do is make a fascinator.

I made this entire dress using my dress dummy and pining it to it etc as I have seen a lot on Project Runway. It was a difficult way to make a dress but it has worked!! I had wanted to use a pattern but it had not arrived in time.

I link to these places

Tuesday, November 12, 2013

What I am working on.

Happy Birthday Sarah
 Firstly the boys and I took a bit of time yesterday to pick and arrange the most gorgeously scented Peonies etc for lovely Sarah. It was her birthday and she is still living in EQC temporary accommodation 3 years after the earthquake, so we took this gorgeous bunch to her.


Starting the bodice section
The back detailing


Once we got home I started sewing again. I am attempting to make a dress for Kerryn's wedding from three Op Shop items. A $10 skirt, a $0.50 shirt and a $2 tunic top. It is taking me a while and I have only been sewing late at night (which is more difficult). But so far I am pleased. So here is a wee shot of the start on my dress dummy.
The linen shirt whose sleeves took my fancy
The $2 linen tunic
The $10 skirt
The cute sleeve detail that I really wanted to keep
I link to these places

Thursday, August 29, 2013

Another Upcycled Merino Boys Top

Yes I have been in my finishing mode again. I cut this jumper out for Jakob about 3 weeks ago. I thought that if I cut it out then I would get it done. But it still languished in my sewing corner.

He had picked the colours about 2 months ago!! He went through my stash of Op Shop Merino jersey's. I then had to sift out which ones would not garner enough material to remake a top. Just like Eli's jersey I used an old Top Kids magazine pattern.

I link to these places
Showing off the coloured facings

Wednesday, April 17, 2013

A boys Refashion


boys hoodie
The finished hoodie - Jakob trying to be Dr Spock.
In a week we are going to Fiordland. It is predicted to rain, rain and rain some more. Which it does anyway (it is not called a temperate rainforest for nothing!). With rain comes the cold. The Merino jersey that I made Jakob last year was not so sucessful. The hood was too big, the Merino wool was a bit too light.

So I had a rush job on. Make a boys hoodie with pocket by Friday. And it is done. It took me two nights (approx 3 hours altogether). I am much happier with this one, the Merino jerseys I chose were heavier and so held their shape better. Also I was pedantic about the finishing and have used bias binding to prevent stretching around the hood / neck area. The sleeve ends look a lot tidier too, the boys love the semiglove end that a lot of tramping gear has and I know it will be handy down in the cold. I also used stitch number 15 on my Bernina sewing machine, rather than the overlocker and this was very successful.

So what started as two ladies Merino jersey's bought from the Op Shop, are now one boys hoodie to keep him warm.
The two ladies merino jerseys I started with
Chop off the arms
bind the edge of the pocket
stitch the pocket on at the top and bottom, matching side seams

Cut sleeve down to size and re-inser
Sew up the arm and side seams, then add the cuffs and hood.

Follow on Bloglovin

Sunday, March 10, 2013

Refashion an Op Shop find

This weekend I physically exhausted myself in the garden (did not take long!!! - a couple of hours each day), which left me with heaps of time to sit and sew for relaxation.

Inspired by my recent finish of a recycled quilt  I went through the stack of unfinished projects by my machine. There was a dress I had bought about a month ago from a Save the Children Op Shop in Christchurch.

I am not very good at sewing clothes for myself from scratch, but if something fits I know I can generally make it look better.

One of the things that really bug me about ladies clothes is NO POCKETS - why why why. Yes I carry a handbag but it is so handy to have pockets. And why was there no fastening at the waist? - so it gaped - no dome or button or anything.

So I made a new collar, new sleeve end, stitched a pocket into the waistband but floats externally, shortened the length and added some bias, added a $1 belt also from the Op Shop and presto - A new outfit that I am thrilled with.

I wore it to church today and heaps of people commented on it.
$10 dress
$1 belt
$5.50 fat quarter of green and black flower material from quilters quarters in Rangiora

Refashion a dress
The finished article.
The before (sorry not good photo)

The before on my dress model

Worn to church this morning
icky 80's collar

off with the collar and half the sleeve


On with a new collar
on with a new cuff

Add an external pocket

jazz up the bottom of the skirts. Shorten by 1 inch and add bias
DONE - I link up to these places


href="http://thededicatedhouse.blogspot.com">
 March Finishes

A gorgeous break in Rarotonga

Woo hoo, A holiday with no kids for 11 days. Bliss, relaxing and warm! BTW it was an early 20th wedding anniversary present to ourselves....