Showing posts with label recycling. Show all posts

Thursday, September 27, 2018

Two years in the making

Two years ago I started stitching with no end in mind. I was in to have a heart valve replacement and needed to have something to do that took no concentration whatsoever. So a running stitch project that was gorgeous to look at was just the thing. Almost two years to the day of the operation I finished and turned it into a bag for winter. 
It is the most densely stitched item I have ever made. But I have fallen in love with running stitch and handwork again. It's made of left over bits of blanket that had been dyed and left over bits of velvet that Jane from Stash Palace gave me. The embroidery is all sorts of thread and thread types, mainly bought from Jane too.
The inside of the bag has a magnetic clasp and a carabiner for attaching my keys, as I'm always losing them in amongst everything else. Two insert pockets and one side elasticated pocket for my phone. I'm really thrilled with it.


Friday, September 7, 2018

Upcycled jersey to dog bed

Both my son and I had been noticing Pins and articles on using old jersey's or jeans to make dog beds. I was in the local Charity Shop and a gorgeous alpaca jersey, in lovely condition, was just $2. with no one to give it to I also bought two old pillow inners for 50 cents each. Pepper has grown out of her temporary puppy bed, no longer needs to be in plastic for those puppy mistakes, so I went home to make her a new bed.
In her too small bed
Two pillow, jersey and Pepper
Before I started she was already lying all over the jersey and playing with the pillows. No sewing machine required just a needle and some upholstery thread. I stuffed a pillow in with no alteration, to the body of the jersey, and stitched the end closed. I undid the other pillow (or rather I came into the lounge to find Pepper doing it for me) and used it to stuff the arms and neck. Sew the holes closed and a few stitches to hold it all together. Completed in front of the TV that night.
As soon as I put the finished item on the floor she was in it. A very happy dog.
Linking to these places.


Friday, April 6, 2018

Finished - recycling my upcycle

A couple of years ago I made this seat from an old bed end and head. At the time the whole family helped strip off the stain and then I polyurethane it. I was never that thrilled with it though as it was just boring pine and I felt it made it look like a park bench that anyone could make and not celebrate the upcycling and recycling ethos. Anyway, after being in the garage for about 8 weeks and slowly doing it bit by bit, here it is. Chalk paint and waxed. 

The picture on the left is how it started life after my original recycle. The update now has it matching the headboard I recently redid. 
To finish the post here is me having climbed without trouble for the first time in months and months. Very happy about that.
Linking to various places here.

Sunday, March 18, 2018

Upcycled blanket and buttons

Well I am really pleased with this. It's come out better than I planned. I used an old blanket from an Op Shop sold as a dog blanket and my husband's Nana's buttons. Total cost $12
On the bed with my hospital quilt. The grey goes fantastically together. 
Finished ready to go on the bed.
 This is the before shot.
Painting and waxing. Using Annie Sloan chalk paint in half Paris Grey and half Antique white
I obtained a MDF cover sheet for $2 from Mitre 10 Mega in Rangiora. There was enough good wood to cut out the size I needed. Put wood glue all over it.
I had a mattress topper previous bought at the Salvation Army Op Shop for $5 sitting waiting patiently as I planned a long time ago what I was going to do. It takes a while to get all the bits you need especially when I don't want to pay any kind of money for it. Glue on all the bumps around the edges.
Once both pieces had the glue getting tacky then it was time to put it all together.


Enter my Nana Schulz button box. Choosing buttons to feature on the headboard. Covered the headboard in the (now rather smart) blanket. This is the first time I have done taping etc but I wanted this to last and do it properly.
Putting the buttons on was a dog of a job. I have a 15cm doll needle and I used that with an anchoring button on the back of each of these. The hole through the MDF had to be small though, goodness this took longer than anything else.

The whole project was done over about 2 months as I have just not been able to get motivated, stay on top of my tiredness etc. I am so thrilled with it though and am enjoying the change it makes.
Linking to these places. and crazy mum quilts.


Tuesday, June 27, 2017

Crafting day with my sister.

My finished boots
Cutting and planning

My sister and I spent a day making Boots / Slippers from the woolen blankets that I dyed and the leather I got from the dump shop. The pattern is amazing and is from Twig and Tale. They are New Zealand designers and makers and their products and patterns are amazing. Very clear and easy to follow and these slippers stitch up so fast.

My sister 


My sisters finished boots. She finished first!
My finished boots
In progress


Thursday, April 6, 2017

A 1970's Chair makeover

1970's Chrome
I am thrilled with my latest effort, although frustrated at some of the mistakes I made.
I had the fabric lined up correctly on the seat so the dogs would go in the same direction on the seat as the seat back. For some reason I thought the seat went on the chair the other way around and so at the last minute I turned it. By the time I realised my mistake I had trimmed excess material and fully stapled the seat. I am just not pedantic enough to undo it and start again.

I bought the chair for $1 as the back was broken and there is bits of rust on the chrome. I used a technique I had seen on one of the many upcycle TV shows I watch, and the chrome improved beyond my wildest expectation. I am proud of myself for the "fixing" I am now managing to do. I wished I had taken more process shots as I took all the coverings off and managed to stabilize the chair back to the strength it would have been.  
The chrome tacks on the back of the chair were quite difficult to do. The previous taking had destroyed the integrity of the chair back, so I had to change the position of them. My poor thumb was bruised and sore for a couple of days.

Linking to these places and crazy mum quilts


Thursday, March 9, 2017

An new hall seat from upcycled chairs


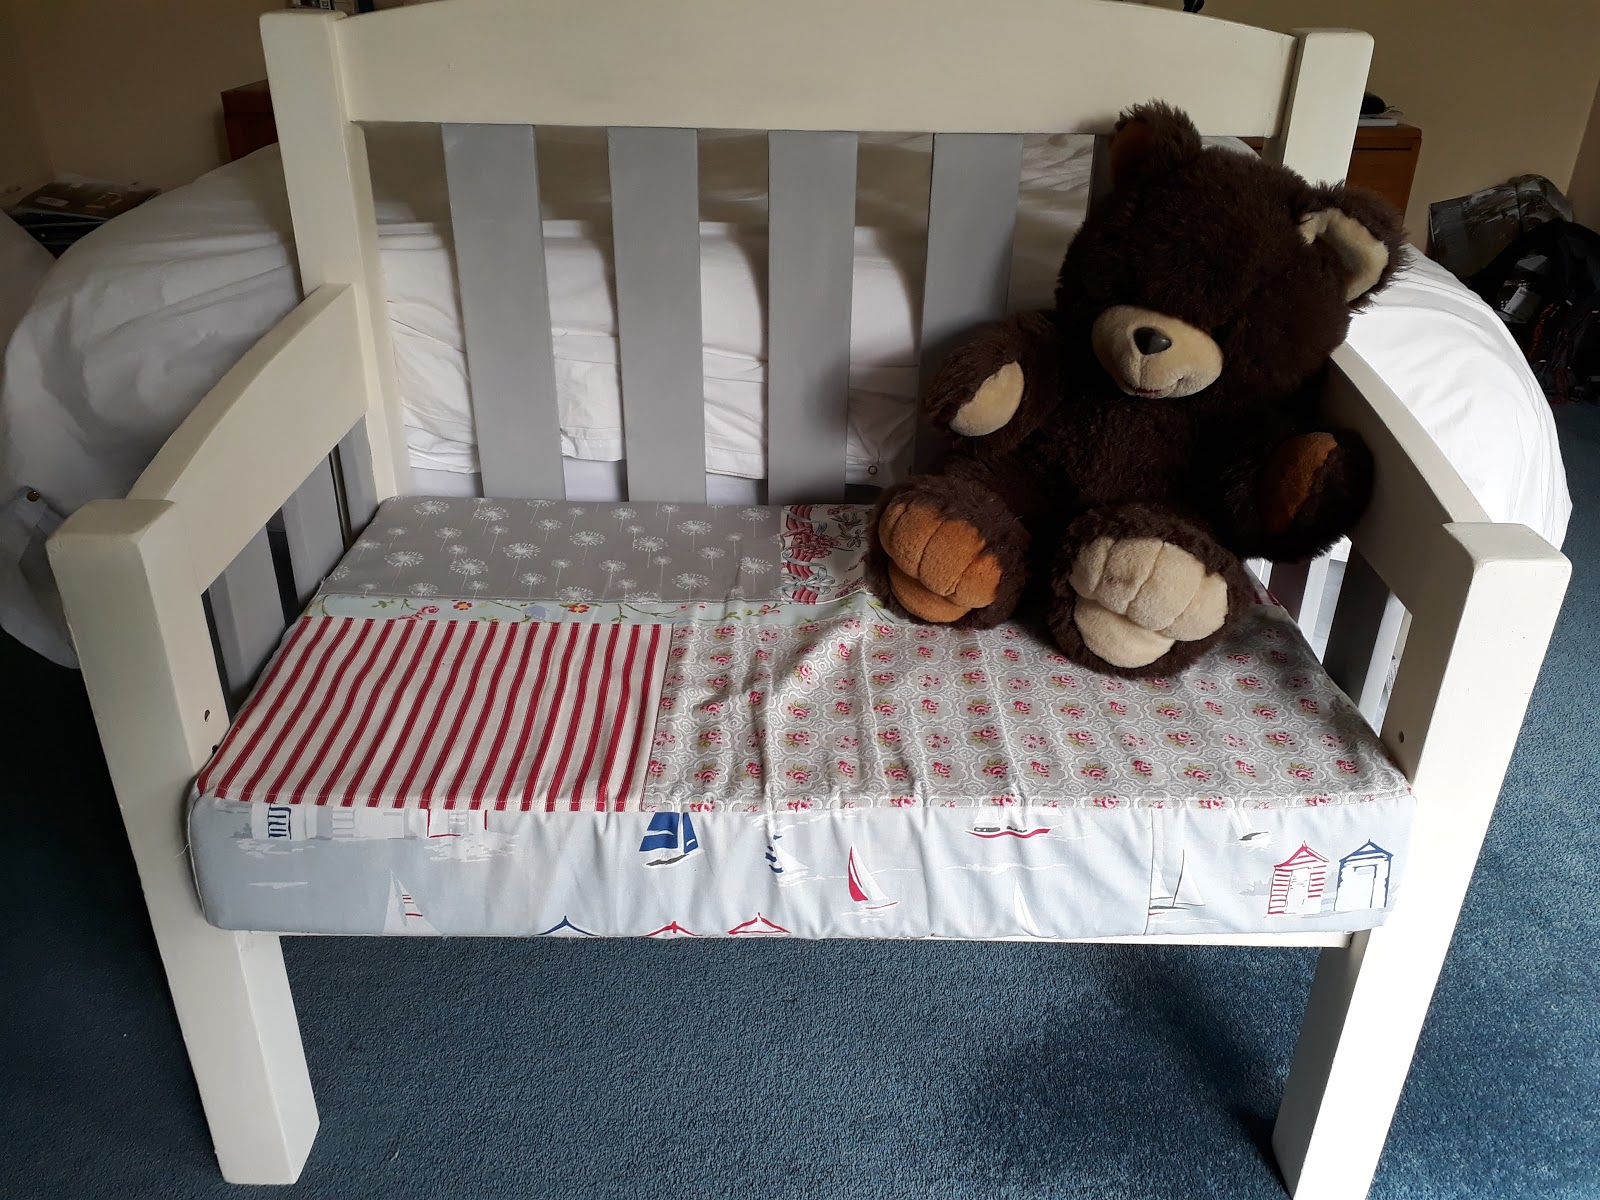
Last night I finished this. Completely upcycled hall chair. Hammered, nailed, glued, painted and upholstered by me. I asked Aaron to come and see the result and he actually liked it. He thought it was going to end up being a tacky piece of ick that he would have to destroy somehow.

Eli determined to be able to sleep on it
9.20pm when I finished and it was put in the Hall 
Eli's comment was "A seat is only good if you can sleep on it. So he decided to try that and ended up with his foot stuck through one of the slats and had to have parental assistance to extricate himself!
I am particularly pleased with the material and paint match. From my favourite store - Femme de Brocante - I purchased the Annie Sloan chalk paint (paris grey with a 1/3 paris grey and 2/3 old white mix on the middle slats) and the fabric for the cushion. There was a much "safer" fabric choice of grey with white dots. But after a bit of debate I decided this fabric would at least give it some individuality. 

reupholstering - really pleased with my neat finish.

Some of my tools at this stage. Cutting the foam for the seat was not easy.

Paris Grey, Old White
You win some and you loose some. I really wanted to get this right so after painting and waxing the chairs I used the previous seat tops to template on cardboard and then put in situ to set the correct space for the joining blocks. If I had looked closer I would have realised that seats were straight so all that time spent shaping has left a rounded seat that slightly protrudes. Blast! 

Painted and ready to create seat base and topper - see the joining blocks in the middle.

So this hall seat started as two broken $5 chairs from the dump shop. I had to construct and glue a new strut in and then do various other gluing and filling as well as a bit of pattern making to work out how to get them to hold together the best. I found using power tools really relaxing as my concentration meant a clear mind at the end, not muddled by other things.

Linking to these places and Crazy Mum Quilts


Sunday, November 13, 2016

Recycling - now funky Christmas decoration for my craft room

 When I went to my quilting retreat I knew I would need a couple of little projects to do when tired. I took all my old thread spools and my bag of scraps. I should have taken a glue gun as that would have been quick and easy, but I did not so I stitched the material onto the spools.
I think I saw this idea either on Crazy Mum Quilts or Cluck Cluck Sew, but as I can't seem to trace it I cannot accurately credit the idea. 
So now it is above the window over my sewing machine, decorating the craft / computer room. 
I love that it is using something normally thrown out. The first Christmassy (and to be honest it will probably be permanently up there) thing in the house.
Linking to these places and Crazy Mum Quilts.


Thursday, May 5, 2016

Bed ends, now a chair.

Aaron and Jakob headed into Mt Cook National Park and up to Mueller Hut. Eli and I stayed behind and got some stuff done. This chair I made from a bed end and bed head. I finally gotten around to finishing the sanding and giving it a polyurethane coat to finish. Yay

It had originally looked like this when I made it.

Eli had his friend over to stay and I could not get down the hallway without being blasted by Nerf guns pellets. They had so much fun with their barricade and it left me to finish the seat, sew and do my assignment.


Up to Mt Ollivier

A gorgeous break in Rarotonga

Woo hoo, A holiday with no kids for 11 days. Bliss, relaxing and warm! BTW it was an early 20th wedding anniversary present to ourselves....